
 SHOW MENU
General Notes

Images (where available) are provided for all states of currently accepted repaired impressions (in both black and red ink as applicable) based on the current Stanley Gibbons Specialised Catalogue, Volume 1 Part 1, 2020. Where new repairs have been accepted since publication these are also included and identified in the text. Currently the site covers the black plates 1 to 11, but the intention is to extend this next to the red Alphabet I imperforate plates, and thereafter to the Alphabet II imperforate and perforated plates.
Images are provided at 1200 dpi resolution (where available) to allow comparison of the characteristics of different states to the best advantage. Once opened on screen several individual images can be compared side by side at maximum resolution.
Text has been added below the first image for each plate to describe what are considered to be the principal characteristics of that particular state, as compared with a later state of the same stamp. Similarly, text is added to the first image of each later state of the impression. Where a red printing follows the equivalent black printing, generally the characteristics of the two issues are considered similar and no text is included for the red, but extra text is added where considered of importance to distinguish changes seen in the red and black printings.
Not all characteristics may be visible on any single image, due to various reasons – e.g. damage or lack of sufficient margins, cancellations, and importantly the degree of wear of the plate at the time of printing. Additional images showing characteristics missing from the main image are included where available.
Wear of a plate, and its effect on the printed impression, is an important consideration, and can in some cases make determination of the state difficult. An early impression in the plate's life can appear very different from a later impression, where wear has affected the fine lines of the engraved image. In these cases some of the characteristics of the repair can fade or be absent. Where characteristics of the repair are considered to be particularly variable or affected by wear over time, text has been added in
In a few cases there is some doubt about whether a recorded repair actually exists, or further validation is considered to be required, in these cases text is in
A simplified description of the plate production and printing process
The following is intended to supply the background information to explain the characteristics of the printed stamps and their repairs. The illustrations are mostly taken from Edward Denny Bacon's classic The Line-Engraved Postage Stamps of Great Britain Printed by Perkins, Bacon & Co (Vol I) (1920), which volume should be referred to for a detailed treatment (available in the downloads section).
![]() Transfer Roller
Transfer Roller
A steel transfer roller, initially in an unhardened state, was prepared from the master die. It incorporated a number of impressions of the die (perhaps 4 to 8) around its circumference.
The transfer roller impressions normally had the corner stars but never the corner letters, as the former were present on the die but the latter were added later to the blank squares.
This roller was hardened after the impressions had been taken up from the die.
![]() Plate Transfer
Plate Transfer
The blank plate to be completed (a heavy piece of steel, flat and about ½" thick, but as yet unhardened) was held in a press, and the impressions for each of the 240 positions (20 horizontal rows by 12 columns) transferred mechanically under high pressure from the transfer roller.
Due to the considerable pressure required, small ridges or burrs were introduced around the periphery of each impression, which required careful dressing or burnishing to remove them, along with any other extraneous marks on the plate.
Where these were not completely removed, coloured streaks or lines remained in the margins of the printed stamps – see section (5) below. Punching of Letters
At this stage the corner letters were hand punched onto the plate, along with marginal inscriptions etc – a fiddly task! The varying position and tilt of the letters are key factors in plating the stamps.
Generally, with a few exceptions, the plate was then case hardened and ready for printing.
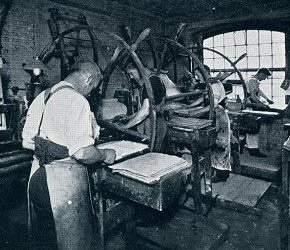 Printing
Ink was applied to the whole of the plate and worked into the recesses cut into the design. The surface of the plate was then hand wiped leaving ink within the recesses.
Damp paper was placed onto the plate and pressed under heavy pressure using a roller, therefore forcing the paper into the plate recesses to pick up the ink within.
Any part of the plate with a groove or recess that sat below the surface of the plate would normally contain ink and show in colour on the printed impression.
White areas of the printed stamp design were those level with the plate's surface and wiped of ink.
The reason for plate repairs
It is considered that wear of the plate was the main reason for repairs to be undertaken. Plate 1 was originally put to press with the plate in an unhardened condition, and this resulted in rapid wear to the plate. Many impressions showed extensive wear to the facial lines of the engraving and background, giving a grey-black appearance to the stamps. This is considered the reason that the whole plate was repaired by re-entry ('Plate 1b' – state 2).
The subsequent early plates (with the possible exception of plate 5) were put to press in a hardened state. Even in a hardened state, plate wear became evident on certain plates, dependent on the time at press and probably also the metallurgy of the plate. It is usually seen towards the extremities of the plate, the top, bottom and sides, and it was at these positions where plate repair was mostly considered necessary. This can be seen by the templates provided for each plate indicating where repairs occurred.
Repair by re-entry
In almost all cases in the early plates, and mostly for later plates, re-entry was the method to repair a worn plate. In a few cases it is understood that repairs were performed by hand retouch.
This term re-entry correctly applies to a position that has been twice entered onto the plate by a transfer roller after the plate has been put to press, and which therefore results in an earlier and a later state for that position. If the second entry was not exactly lined up ('coincident') with the original impression, some duplication of the design may be seen, and this is termed a non-coincident re-entry. Otherwise, if the second entry is coincident, it may result in compression of parts of the design, particularly the check letters, sidelines, or corner stars, and restoration of fine lines of the engraving which had become worn.
The following typical criteria – either alone, or more often in combination –may help determine that a repair has taken place, resulting in differences compared with the original state of that impression.
Non coincident re-entries
Where a repair was undertaken by re-entry, but the second entry did not fully coincide with the original impression on the plate, it is relatively easy to recognise that a repair has occurred. However there are relatively few instances of non-coincident re-entries.
Certain aspects of the design of a later state may be seen duplicated from the original state but in a slightly different position, e.g. major rays of the corner stars, or there may be some distortion of inscriptions. A 'twisted' re-entry may result in a relative change in the position of one or both check letters, as seen on the repair to plate 1.

Plate 5 PB state 3 – non-coincident re-entry with duplication in 'ONE PENNY'
Coincident re-entries
Most repairs by far were coincident re-entries with no obvious duplication in the design of the later state, therefore other criteria are required to determine that a repair has taken place. The following describes the majority of such characteristics that may help determine a repaired state.
-
Restoration of worn engraving. The principal reason for a repair was to restore the worn engraving of the head and background, so a newly repaired impression was normally strong with restoration of the fine lines of engraving. Depending on the number of sheets subsequently printed, and perhaps the inherent properties of the plate, wear could reoccur – hence this is not always a reliable factor alone (as an early printing in the original states will also show a strong impression).
It is noticeable on the black provisional printings that, due to the few sheets actually printed in black after the provisional repair, these generally all show as a strong impression.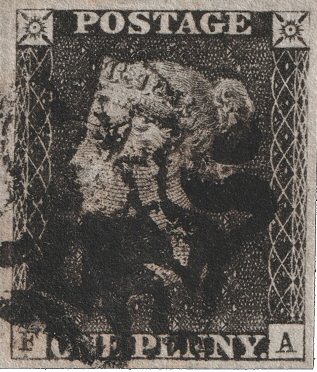
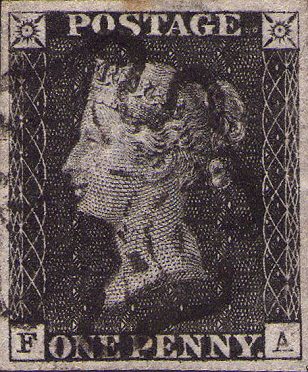
Plate 5 FA – states 1 (worn) and 2 (strengthened)
-
 Thinning of corner letters. Since the transfer roller impressions had no corner letters, a second entry could tend to compress the original recesses of the lettering that had been punched into the plate, resulting in thinning of the letters after the repair.
This thinning can be slight or quite pronounced, and sometimes one or both check letters became very faint – a feature that is a strong indication of a repaired state.

Plate 5 TB state 2 ('B' now very faint) and OB state 2 (thinned letters, especially 'B')
-
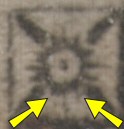
Thinning or restoration of corner stars. The transfer rollers in most cases were complete with corner stars (which were present on the master die), and there would be little alteration in their appearance after repair. However it is known (e.g. for the 'VR' plate) that on some roller impressions the corner stars were burnished out. If such a roller was then used to re-enter a plate, the original corner stars could become quite thinned or faint due to compression – a feature seen on a number of the early plates. Where a second or later repair occured using a normal transfer roller impression with corner stars, their appearance may be restored.

Plate 9 AF state 2 – stars weakened

Plate 9 AF state 3 – stars restored
-
Strengthening of sidelines. Weakened sidelines following plate wear, or where the original impression was weak or damaged, could be restored following re-entry. However on later printings following a repair the sidelines could becomed weakened again – so this characteristic alone may not confirm a repair, and further evidence is required.
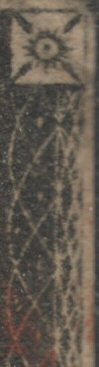

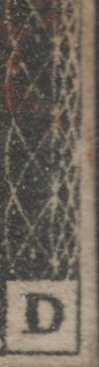
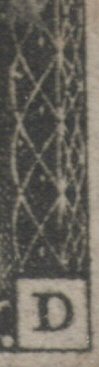
Plate 6 PD states 1 and 2 – both sidelines strengthened
-
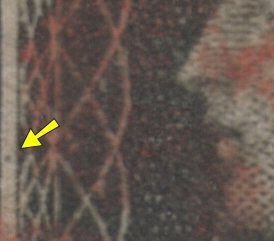
 Introduction (or disappearance) of Transfer Roller Lines and scrapes. When the transfer roller was rolled onto the plate under high pressure, the resulting compression on the metal would tend to cause a raised marginal burr to occur just outside the margins of the impression.
This was normally removed by hand without affecting the plate, but in some cases after repair well defined coloured streaks or lines (transfer roller lines, abbreviated TRLs) remained in the margins. These can vary in appearance – sometimes they are well-defined, thin and linear, others are more broad and diffuse.
Smaller constant coloured marks or scrapes, often within the margins between impressions, can similarly appear on stamps following a repair.
Note that TRLs and marks tend to fade with plate wear, so vary in appearance for stamps in identical states.Plate 11 AE state 2 – strong TRL in left margin
-
 Re-appearance (or disappearance) of the die dot. The die (or plate) dot which was present on the original die is situated in the left margin, just outside the sideline and nearly opposite the Queen's mouth. The dot would be picked up and transferred via the roller to each impression on the plate.
During the plate cleaning up operation and removal of the burr thrown up by the transfer roller (see above), the dot was often removed. However, following a repair the dot may have been retransferred to the plate and on occasions it escaped removal.
This feature can be difficult to detect easily, and may disappear with plate wear, so its absence should be treated with caution when determining the state.Plate 6 QC state 2 – die dot now visible
-
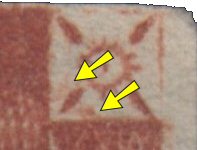 Appearance of 're-entry' marks. Normally found at the lower left corner of the right star, these marks may be due to contact from the transfer roller. Usually they take the form of two fairly faint coloured marks (scrapes), one just above and parallel to the lower baseline of the cross, the other just above and parallel to the main SW ray of the star.
It is believed that these may be evidence of a 'short' re-entry, as in these cases previous frame breaks or other characteristics of the star are not altered following repair – the upper area excluded from the re-entry. It appears also that in some cases a TRL ends at this location, again suggesting a short entry.
These marks are generally not very prominent and quickly fade with plate wear, so do not always show.Plate 11 AF state 2 – re-entry marks showing in top right square
-
Alteration of rays of the corner stars. Where a different transfer roller was used for the repair, in some cases this caused the characteristics of the corner stars to be altered in the repaired state.
The ray flaws of the NW corner star of plate 1a and 1b are a well recorded example, and in most cases are a useful means to aid separation of the two states – plate 1a has a "5 o'clock ray flaw", while plate 1b has a "7 o'clock ray flaw" (except CL in both cases). Both states have a "10 o'clock ray flaw" (except CL, RL, SL, TK and TL). Some letterings do show an intermediate form, with both 5 and 7 o'clock rays present to some degree.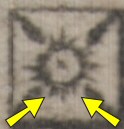
Plates 1a and 1b – typical upper left corners showing 5 and 7 o'clock rays
Plate 2 is another example – in a number of cases the 7 o'clock ray flaw was restored following repair, showing that a different transfer roller was employed. In some cases the 10 o'clock ray flaw was also restored.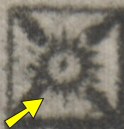

Plate 2 states 1 – 7 o'clock ray flaw and 2 – ray restored
-
Disappearance of the 'O' flaw. In the original state, many impressions on plates 8 to 10 are characterised by the 'O' flaw, a white flaw within 'ON' of 'ONE' that appears in various stages (known as stages 1 to 3). In most instances following a repair this flaw was obliterated, or nearly so, and this is an important characteristic in the repairs of these plates. Sometimes an indentation also occurred below the baseline of the plate at the location of the 'O' flaw.

Plate 10 DH state 1 – 'O' flaw stage 3

Plate 10 DH state 2 – 'O' flaw obliterated after repair
-
Right Star (Cross) Flaw – Weakness of the SE ray of the NE star. Frequently on plates 8 to 10 impressions show a weakness in the SE ray of the NE star in the original state. This can take the appearance of a small white mark within the ray, and in many cases after compression during the re-entry process the defect is more pronounced and the ray can become very faint.

Plate 9 AF – very weak SE ray
-
Retouched and re-engraved check letters. In a few instances during repair of the early plates, it is evident that check letters were retouched or re-engraved, altering their appearance or position.

Plate 1a JC – original positions of check letters

Plate 1b JC – changed positions of check letters

Plate 5 QA state 2 – 'Q' much weakened

Plate 5 QA state 3 – 'Q' now strong – re-engraved
-

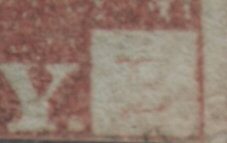
 Addition of horizontal and vertical guide lines in corner squares. On the repaired plate 1b, most impressions in the 'I' and 'J' horizontal rows show inscribed horizontal and vertical "guide lines" (hgls and vgls) that do not show in the original state of the plate.
These guide lines are found within both the corner stars and the letter squares. They are believed to have been added to the plate to aid positioning of the transfer roller during the original repair of the plate that produced 'Plate 1b' from 'Plate 1a'.Plate 1b JE (state 2) – 'J' square showing guide line on black and red printings


